Import a DAZ pose to Blender
[Update 25/02/2021] I leave this post here as archive but it was initially written in 2013 and fortunately, it is not relevant anymore with progress with FBX import/export made in both Daz and Blender. These days, it simply takes a one-way FBX trip from Daz to Blender to achieve the same thing.
If like me you enjoy using DAZ3D for its characters, its morphs and to pose characters, but if you like using Blender better to finish the pose and render work, you may have some trouble to find a suitable workflow between DAZ and Blender.
To import a DAZ character with its rig and skinning to Blender, no problem, the Collada format works very well between the 2, especially since version 2.6 (before it used to crash on me on a regular basis…).
The problems start when you want to import poses from DAZ to Blender. The Collada format does not import (or export, I don’t know at which step the information is lost) poses or animations. So we need to use bvh for this purpose. I initially thought that with the mocap tools recently added to Blender, this step would be pretty straightforward, but unfortunately, a simple retarget between my collada import and my bvh pose doesn’t work well : the mesh ends up all messed up. I suppose the problem comes from the fact that the skeleton is not exported in the same way in Collada and bvh : the bones are not positionned and oriented identically, which ends up in distorsions during the retarget phase. After some tries, I ended up finding a way to retarget my poses/animations exported as bvh to a character exported/imported as Collada between DAZ and Blender.
If you’re interested, hereafter the steps I follow to do this. Please note that this works between DAZ 4.6 and blender 2.68 and has been tested with Genesis. It should work with versions a little older but I can’t garantee it will.
- In DAZ, pose your character.
- Export it as collada
- Then export the pose as bvh
- Import the collada to Blender : we’ll name it the character or the character’s skeleton
- Very important step: Apply rotation and apply scale on the imported mesh and armature. (CTRL + A and select rotation and scale).
- In Edit mode, delete the ‘Genesis’ bone.
- Import the pose as bvh on another layer : we’ll call it pose armature or pose skeleton.
- Select the pose armature then the character’s armature and apply the copybones script we can find later in this post (see below). Warning, do not move any of the armatures before proceeding, they need to be centered in the same place.
- Select the pose armature again then the character’s one (in object mode), then in mocap tools (this pannel appears in the object part of the properties), click on guess hierarchy mapping, then on retarget
- In most cases, you’re done, your character should be posed as expected.
- But it sometimes happens that the fingers end up all messed up. In this case, select the character’s armature and switch to pose mode, select all bones (A) then hit ALT+G to perform a clear location : it should fix the fingers.
It’s done!
The copybones script:
It’s just a little script, put together very quickly, which copy the position and the roll of a skeleton’s bones to another skeleton. I wrote it for the sole purpose of the process described here and it only works if both skeletons bones are the same. I tested it only during the process described above, so don’t expect it to work in any other situation.
You can download it here:
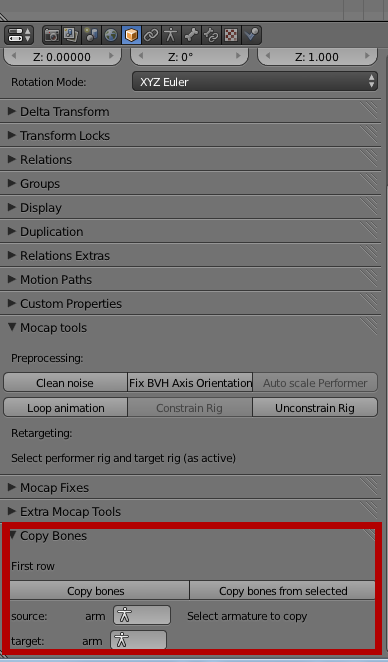
To use it, unzip the content to the scripts/addons directory of your Blender install. In Blender, go to File/User preferences/Animation. Activate ‘copy bones location’. Once active, a new panel should appear the object panel of the properties :

To launch the script, select the pose armature, then the character’s one (be careful to not move either of them after import before proceeding) then click on copy bones. Your character’s armature should move, but it’s to be expected. You can then proceed with the next step.
Have fun!